Package React Applications using Docker
Package your React applications with Docker for faster build, testing and deployment.

Software developer, teaching others how to write better code.
As React developers, we all have gone through the pain of deploying our apps on different environments or setting them up on different machines which indeed is no fun at all. Docker helps us containerize our React applications with all the packages and dependencies which are needed to run the app on different servers with ease. In this article, we will talk about the step-by-step process to containerize React applications using Docker for easier and quick deployments.
What is Docker?
This blog post is not a complete Docker guide so I will not dive very deep into this topic. But just to get some gist, Docker is a containerization tool that packages your application along with all of its dependencies into containers which help in faster shipping, testing, and deployment.
When you create a docker image it shares a part of your machine's kernel and gives you an independent and isolated environment to run your application.
Advantages of using Docker with your React app
Using Docker with React applications can be useful in many ways, a few of them are:
Consistent environment: Docker helps in creating a consistent environment to run your application irrespective of the operating system that you are using on your host machine. This can help in avoiding many underlying issues which might occur due to the inconsistency between the environments where you are running your application.
Bundling of dependencies together: Docker helps in bundling all the dependencies which are required to run the application together to avoid the chance of conflicts or versioning related issues.
Faster deployments: Docker can significantly simplify the deployment process but building the app into a container that can easily be deployed to different environments. Additionally, Docker has a very powerful caching mechanism which makes the deployment process even faster.
Setting up Docker for React application
Now that you are convinced that Docker can be a useful tool when working with React applications, let's see how we can set it up together with a React application.
To get started, we need a React application. We can use an existing application or create a new one.
Setting up Dockerfile
Once we have a React application set up, the next step is to create an Dockerfile at the root of the project.
🗒️ Note: The file name should be
Dockerfile(with no extensions).
Dockerfile is a text document that has all the instructions required to build an image.
Every Dockerfile should start with FROM instruction, which specifies a base image that can be used to build the subsequent image.
FROM node:alpine
In our case, we are using node:alpine as our base image which is a significantly lighter version of node and makes the download and deployment a lot faster.
Let's now copy all the files from our React application to our Docker image using the COPY instruction.
COPY instruction copies all the files and directories from the source path to the destination path inside our image.
FROM node:alpine

COPY . .
Using the above instruction we copied all the files from the root of our app to our image.
Now that we have all the files and directories copied, we can now run npm install inside our image to install all the required dependencies for our application. To do so, we can use RUN instruction which is used to run commands inside the container.
FROM node:alpine

COPY . .

RUN npm install
This will now install all the required dependencies inside our container and we should now have everything we need to start our React application.
We can start our application using the CMD instruction which is used to assign default executables to the container which will be executed when we run the image.
FROM node:alpine

COPY . .

RUN npm install

CMD ["npm", "start"]
We are using ["npm", "start"] as our default command which is used to spin up our React server.
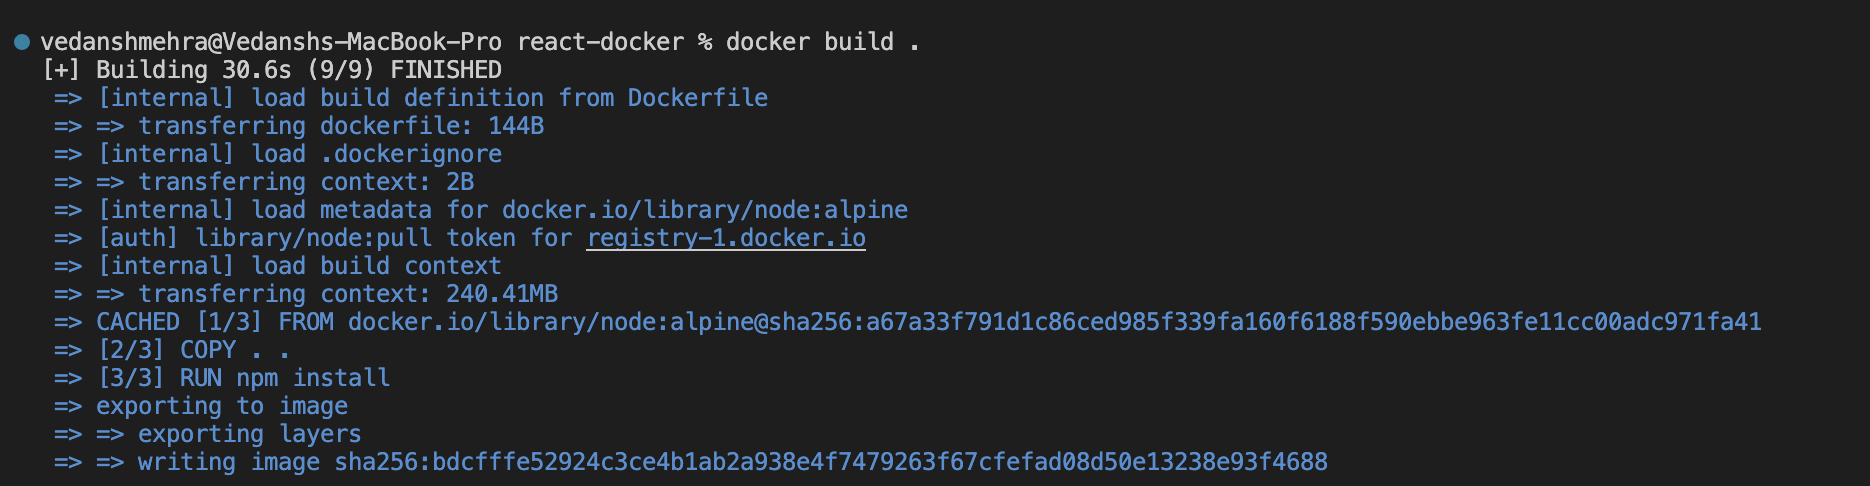
It's time now to build our image, we can run docker build . command from our terminal to build the image.
docker build .
Once the image is built successfully it returns an image ID that can be used to run the image.
Tagging an image in Docker
Using the image ID to run the image might not be the most convenient thing to do, to avoid that docker has a way to tag our images to a specific name and then run the images using that name instead of using the image ID.
docker build -t react-docker .
We can use -t flag with the docker build command to tag an image to a specific name, in our case I am using "react-docker" for our image name, but we can use any other name that we want.
Running images in Docker
Once the image is successfully tagged to a specific name, we can run the image using docker run command.
docker run react-docker
This command will execute the default command that we have given to CMD instruction in our Dockerfile. In our case, that command was npm start which will start the React server.
Once the image starts running, we should see similar to the following message in our terminal:
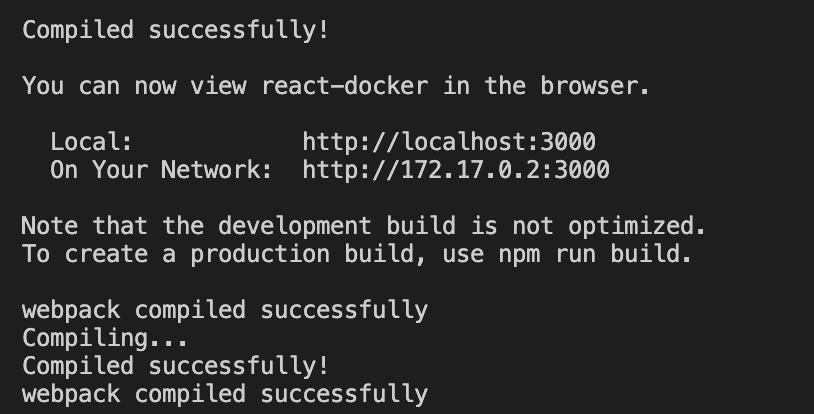
This tells us that our app is running successfully on localhost:3000.
Port mapping in Docker
After running the docker run command shown above, if you will try to visit localhost:3000 you will notice a very weird thing. You will see that nothing is showing up on localhost even though the above message says that our app is up and running🤔.
This is because when we executed the default command it started the server inside our container and we are trying to access that server on our host machine but there is no actual connection between these two different environments.
To solve this issue Docker has a technique called "port mapping", also known as "port forwarding" which is used to export the Docker containers port on our host machine and allow accessing services running inside our containers from our host machine itself.
The easiest way to map ports in Docker is by using -p flag along with the docker run command.
docker run -p 3000:3000 react-docker
This will expose all the services running on port 3000 on our container to our host machine.
If we will try to visit localhost:3000 on our browser now, we should have our app running successfully.
Fixing a few gotchas with the current setup
So far, so good! Our app is running properly and everything else seems to be working fine but let me tell you, there are a few gotchas in the current configuration that needs our attention.
The first thing is we are copying every file and directory from our React application to the root of our container, which is generally not a good practice.
It is recommended to organize all our files inside a working directory in the container for better maintainability and to avoid conflicts with the default files. To do that, we can use WORKDIR instruction to create a working directory inside our container and all the subsequent instructions will run inside the working directory only.
FROM node:alpine

WORKDIR /app

COPY . .

RUN npm install

CMD ["npm", "start"]
This will now create a working directory called app inside the container and all the instructions after that will run inside the same working directory.
The other big gotcha with the current setup is whenever we make any changes to any of the files and rebuild our image, all the instructions are re-running including the npm install command.
This is fine as far as we have a small application with only a few dependencies but as the project grows and we add multiple dependencies running npm install after every change can be very time-consuming and is not something that we want.
Docker has a very useful cache mechanism, which caches each layer of the image when we run the image and during the next build it checks the cache to see if it has the cached version and re-uses it instead of rebuilding the image.
To take advantage of this cached mechanism it's important to structure our Docker configuration in such a way that the frequently changing instructions are placed at the end of the file.
In our case, we want to run npm install only when we have made any changes to the package.json.
FROM node:alpine

WORKDIR /app

COPY ./package.json /app/package.json
RUN npm install

COPY . .
RUN npm install

CMD ["npm", "start"]
This will now only run npm install only when there is some change to the package.json file otherwise it will use the cached version and only re-run the instructions which have changed.
Conclusion
In this article, we have learned how to containerize React applications using Docker and some of the recommended configurations to speed up the build process.
Overall, we can use Docker with our React application to ensure consistent build across different environments which will result in faster deployment and testing of our application.
That's it for this article, I hope you liked it. Please feel free to add your thoughts in the comments.
If you liked this article, there is a huge possibility that you will like my tweets too. Please check out my Twitter account for more content about web development, Javascript, React, and a lot more.


